
Medium
Makes: 9
-
Quick & easy (production)
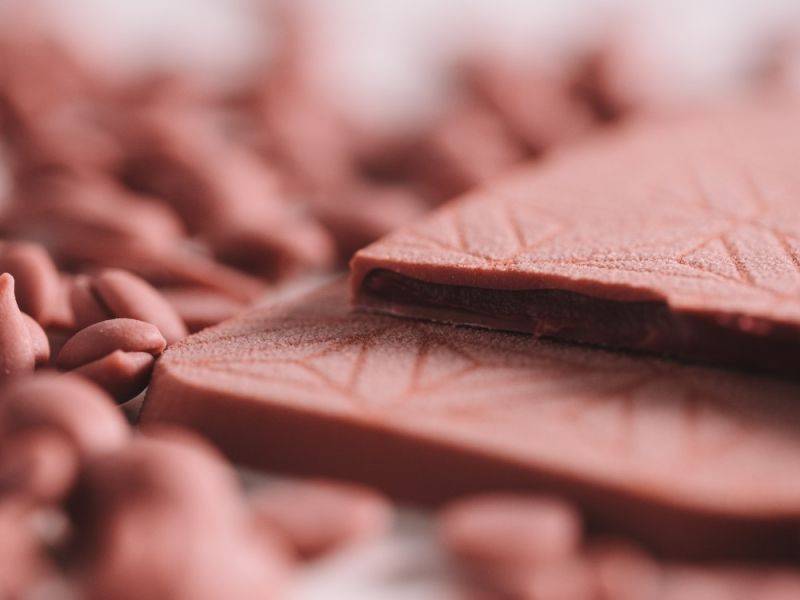
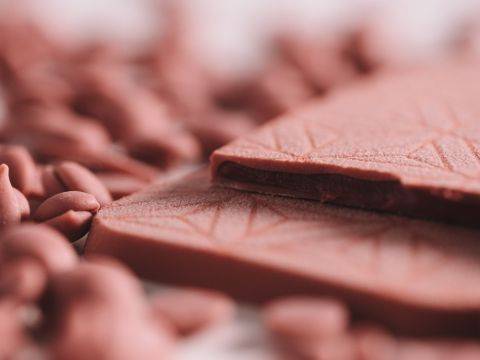
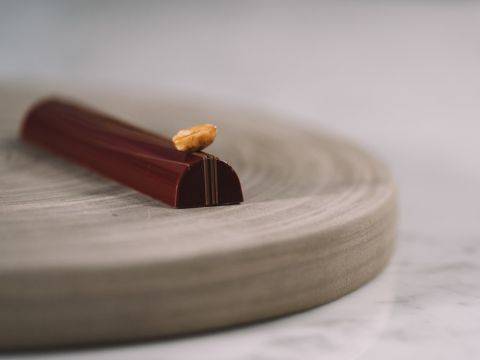
Play with Callebaut’s new couverture - Ruby RB1 - to create a Ruby tablet. You will learn how to create a shell with Ruby and how to use Ruby RB1 in a ganache. Ruby RB1 pairs very well with fresh and acidic fruits and it enhances the flavor of raspberry in the ganache. You will also learn how to apply a unique decoration to the tablets using a stencil.Play with Callebaut’s new couverture - Ruby RB1 - to create a Ruby tablet. You will learn how to create a shell with Ruby and how to use Ruby RB1 in a ganache. Ruby RB1 pairs very well with fresh and acidic fruits and it enhances the flavor of raspberry in the ganache. You will also learn how to apply a unique decoration to the tablets using a stencil.Play with Callebaut’s new couverture - Ruby RB1 - to create a Ruby tablet. You will learn how to create a shell with Rub...
- Shelf life:
- 21 Days
- Conservation:
- Between 8ºC - 16ºC
Containing: 4 Components
Molding
Ingredients: Molding
-
Q.S.CHR-R35RB1
Preparation: Molding
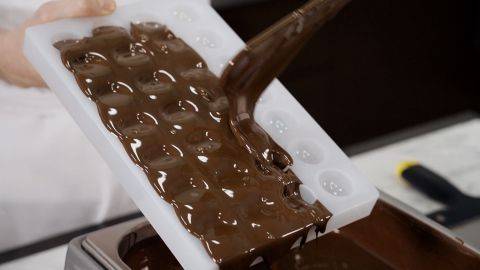
- Start by polishing the mold with a soft cloth. It is important to polish well the molds to give the tablet a nice shine once unmolded and to make sure to remove any traces of previous chocolates, fingerprints or dust.
- Warm up the ladle with a heat gun to prevent a temperature shock, then check the fluidity of the ruby RB1.
- Use the ladle to pour Ruby RB1 onto the molds. Using a palette knife, spread the RB1 to fill the mold evenly and then scrape the excess off the molds. Keep your mold fairly horizontal so that the Ruby RB1 stays in the mold.
- Tap the mold well on the table for a few seconds to remove any air bubbles.
- Return to the melting kettle, turn the mold upside down and tap using the handle of a spatula to remove all excess of Ruby RB1 leaving a nice coating on the mold, then scrape the underside of the mold with the metal edge.
- You can then flip the mold back up and scrape the top of the mold to clean it, as well as the edges.
- Tap the mold again on the table and then place it upside down on the parchment paper.
- Let the molds set at room temperature until Ruby RB1 fully crystallizes. In between molds, clean well the edges of your scraper and palette knife, you can heat the metal with the heat gun to help in this process.
View tools
- Scraper
- Parchment paper
- Soft cloth
- Ladle
- Melting kettle or automatic tempering machine
- Heat gun
- Palette knife
- Cacao Barry polycarbonate tablet mold
Ruby Raspberry Ganache
Ingredients: Ruby Raspberry Ganache
-
6.9 ozCHR-R35RB1
-
1.3 ozHeavy Cream 35%
-
1.6 ozCrème fraiche
-
3.3 ozraspberry puree
-
0.8 ozglucose syrup
-
0.5 ozdextrose
-
0.8 ozsorbitol
-
0.8 ozraspberry powder
-
0.7 ozbutter
-
0.8 ozCreme de framboise alcohol
Preparation: Ruby Raspberry Ganache
- Melt Ruby RB1 to 40°C (104°F) and transfer into a tall recipient.
- Combine the heavy cream, crème fraiche, raspberry purée, glucose, dextrose, sorbitol, and raspberry powder in a saucepan over a cooktop at medium heat until it dissolves. When adding the raspberry powder, add it slowly and blend it well as not to form any lumps. If you still have lumps you can use a whisk to smoothen the mixture.
- Once the raspberry powder is well blended, add the butter. Mix well using a whisk and make sure the butter is melted.
- Cool the mixture to 30°C (86°F), you can use a thermometer to check that the mixture is at 30°C (86°F).
- Add the mixture to the Ruby RB1 that has been previously melted to 40°C (104°F).
- Combine the melted Ruby with the warmed infusion and blend with an immersion blender to emulsify.
- With a spatula, scrape to make sure that all the ingredients have been properly blended and combined. The temperature of the ganache should be 30°C (86°F).
- Add the crème de framboise alcohol at the end, once the ganache is well blended, in order to preserve the flavor of the alcohol and bring a more pronounced raspberry flavor.
- Blend once more using an immersion blender.
- Pour the ganache into a piping bag. For ease of use, you can place the piping bag into a tall container, with the edges of the bag over the recipient. This makes it easy for you to pour the ganache into the piping bag.
View tools
- Cooktop
- Saucepan
- Whisk
- Tall recipient
- Thermometer
- Immersion blender
- Piping Bag
- Bowl(s)
- Spoon
- Spatula(s)
Assembly
Ingredients: Assembly
-
Q.S.CHR-R35RB1
Preparation: Assembly
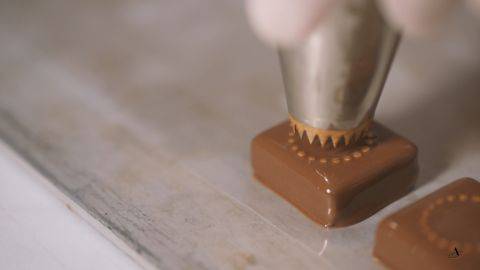
- Take the piping bag with the ganache and cut a small tip to control the flow.
- Pipe the raspberry ganache into the prepared mold.
- For this mold, a nice and steady left to right movement is ideal to fill the mold evenly. Make sure to leave enough space – at least 1mm (0.04”) within the top – to close the molds later on.
- Tap the molds on the table to make sure that the ganache is evenly spread out into the molds and to remove any remaining air bubbles.
- Allow the ganache to crystallize until firm for at least 12 hours but preferably overnight at room temperature before closing the molds with tempered Ruby RB1.
- When the ganache is properly crystallized, using a heat gun, slightly warm the top of the mold to barely melt the Ruby shells. By doing so, we ensure that they will all join together perfectly when we close the mold with pre-crystallized Ruby RB1.
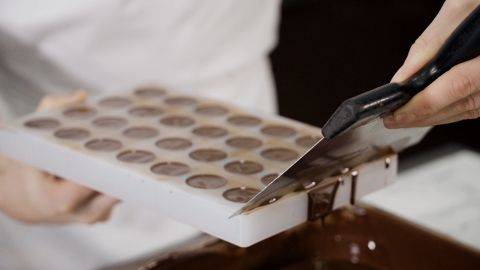
- When you close the molds, always make sure to work with pre-heated tools (palette knife and scraper) in order to avoid a temperature shock.
- Remove the excess and clean the side of the mold well by using a palette knife.
- Tap the mold onto the table to release all air bubbles from Ruby RB1.
- Place the molds on a metal tray lined with parchment paper.
- Put into the refrigerator for 15-20 minutes to promote the crystallization and until solid enough to be unmolded.
- Remove from the refrigerator and start unmolding by slightly flexing the molds.
View tools
- Metal Tray
- Scissors
- Parchment paper
- Melting kettle or automatic tempering machine
- Heat gun
- Palette knife
- Spatula(s)
Decorations
Ingredients: Decorations
-
Q.S.IBC - Red color Cocoat butter
-
3.5 ozCHR-R35RB1
-
3.5 ozCallebaut Cocoa Butter
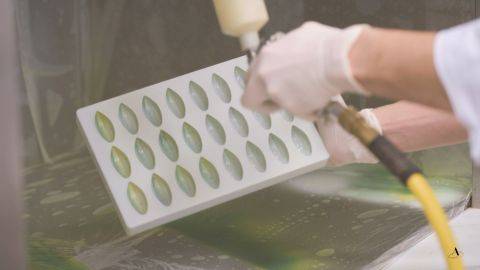
Preparation: Decorations
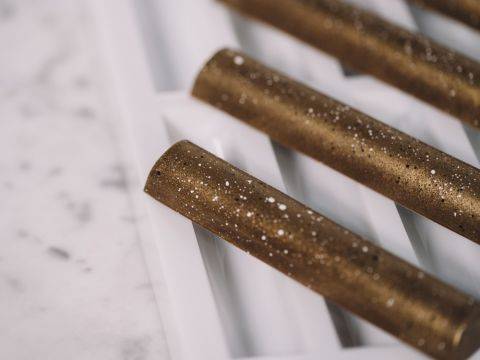
- In a bowl, pour the melted cocoa butter into the melted Ruby RB1 and combine them together – no need to temper it.
- Divide the mixture in half.
- To one of the bowls, add the colored cocoa butter. Add as much or as little as you want to create a different shade of pink, in order to achieve a nice contrast.
- Place the tablets onto a plastic lined tray and place in the freezer for 10 minutes, until the surface of the tablet is well frozen.
- Remove the tablets from the freezer and immediately spray them with the colored cocoa butter mixture to give a velvet effect. As always, keep the spray gun at the same distance and using the same pressure at all time in order to have a nice and even coloring. Because of the temperature difference between the cocoa butter and the Ruby RB1, you will get a nice velvety result.
- To keep the tablets cold, replace them into the freezer. When you are ready for the second coat, refill the spray gun with the second colored cocoa butter mixture. Place delicately the stencil of your choice onto the tablet. Spray the tablets with the stencils as you did with the first mixture. Remove the stencils and allow the tablets to come back to room temperature for at least 12 hours before handling them.
View tools
- Metal Tray
- Bowl(s)
- Spray gun
- Plastic film
- Spoon
- Stencils
- Spatula(s)
Facing Problems with your Creations?
- Find troubleshooting guides & tutorials
- Chat live with an advisor chef and find the right solution to your challenges


Comments