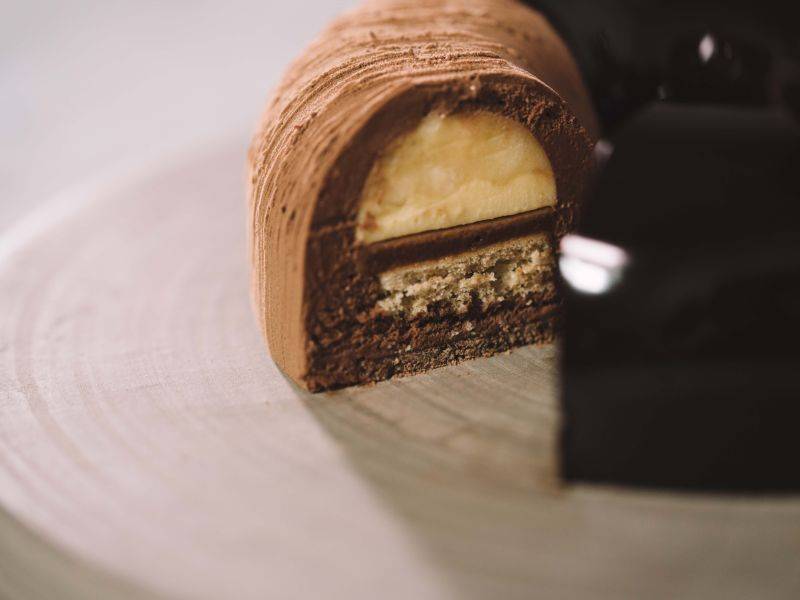
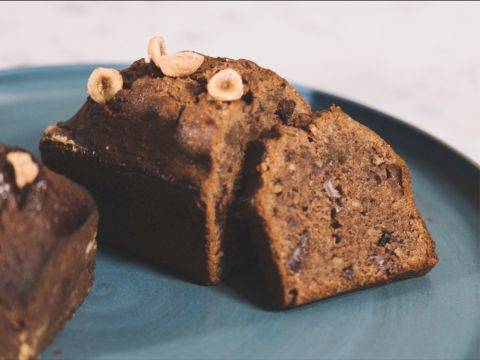
In this eye-catching cake, the classic flavors of banana and chocolate are combined with caramel, hazelnut, and passion fruit. With textures ranging from creamy to crispy, each slice offers an incredible experience.In this eye-catching cake, the classic flavors of banana and chocolate are combined with caramel, hazelnut, and passion fruit. With textures ranging from creamy to crispy, each slice offers an incredible experience.In this eye-catching cake, the classic flavors of banana and chocolate are combined with caramel, hazelnut, and passion ...
- Shelf life:
- 2 days
- Conservation:
- Refrigeration at 4°C/39°F
Containing: 13 Components
Banana and Passion Fruit Marmalade
Ingredients: Banana and Passion Fruit Marmalade
-
145 gBananas, cubed
-
25 gpassion fruit puree
-
110 gBanana purée
-
12 gsugar
-
2 gpectin NH
Preparation: Banana and Passion Fruit Marmalade
- Heat the bananas and both purées to 40°C (104°F).
- Premix the sugar and the pectin together and add to the purées in the saucepan once the preparation reaches 40°C (104°F). Then bring the whole preparation to a boil.
- Once the mixture is boling, remove the mixture from the heat and pour 135 g (4.76 oz) into the mold.
- Use an offset spatula to evenly spread the marmalade. Tap the mold on the table to make sure it is evenly filled.
- Freeze until solid.
View tools
- Cooktop
- Saucepan
- Metal Tray
- Offset spatula
- Scale
- Spoon
- Infrared Thermometer
- Silicone Savarin Mold: 15 cm (6”) circumference
- Spatula(s)
Banana and Passion Fruit Crémeux
Ingredients: Banana and Passion Fruit Crémeux
-
130 gBanana purée
-
25 gegg yolks
-
35 gpassion fruit puree
-
40 gHeavy cream, 35% fat
-
13 gsugar
-
18 gGelatin mass (1:5 gelatin powder 200 bloom: water)
Preparation: Banana and Passion Fruit Crémeux
Heat everything except the gelatin mass to 82°C (180°F).
Once at 82°C (180°F), add the gelatin mass and mix again until the preparation is completely smooth.
Pour 110 g (3.89 oz) over the frozen marmalade in the mold.
Place back into the freezer.
View tools
- Metal Tray
- Scale
- Thermomix®
- Spatula(s)
Banana Bread
Ingredients: Banana Bread
-
115 gsoft butter
-
100 gsugar
-
90 gbrown sugar
-
2 gsalt
-
260 gAll purpose flour
-
5 gbaking powder
-
5 gbaking soda
-
2 gground cinnamon
-
150 gwhole eggs
-
300 gBanana purée
Preparation: Banana Bread
- Using the tabletop mixer, combine the soft butter, both
- sugars, and the salt on high speed to incorporate air.
- Mix all of the dry ingredients together and sift them.
- Gradually add the eggs to the mixing bowl and slowly increase the mixer to high speed.
- Scrape the bowl to make sure that all the ingredients are well incorporated.
- Add the banana purée and continue mixing on high speed.
- Make sure the banana purée is lukewarm. If the purée is too cold, the preparation will split.
- Then, with the mixer speed reduced to low, gradually add the dry ingredients. Mix until all the ingredients are incorporated.
- Pour the preparation onto a silicone mat and spread it out evenly with an offset spatula.
- Place on a metal tray and bake at 170°C (338°F) for 8 minutes.
- Remove from the oven and allow it to cool.
- Once the banana bread has cooled, cover it with a sheet of parchment paper, flip it over, and remove the silicone mat.
- Use the 8.5 cm (3.35”) and 15 cm (5.9”) ring cutters to create a disc of banana bread with a hole in the center. Set aside for use in the next step.
View tools
- Knife
- Parchment paper
- Offset spatula
- Mixing bowl (s)
- Silicone mat
- Tabletop mixer, mixing bowl and a paddle attachment
- Ring cutters: 8.5 cm (3.35”) and 15 cm (5.9”)
- Spatula(s)
- Sifter
Exotic Salted Caramel
Ingredients: Exotic Salted Caramel
-
45 gHeavy cream, 35% fat
-
12 gBanana purée
-
10 gglucose syrup
-
57 gsugar
-
18 gpassion fruit puree
-
gSmoked sea salt
-
6 gbutter
-
10 gegg yolks
-
18 gJAVA
-
10 gGelatin mass (1:5 gelatin powder 200 bloom: water)
Preparation: Exotic Salted Caramel
- Bring the cream mixed with the banana purée to a boil. Once boiling, remove from the heat.
- In another pan, begin melting the glucose syrup. Once it has melted, gradually add the sugar, and cook the mixture to a medium-dark caramel.
- Do not overmix the sugars while cooking or the caramel may have a grainy texture.
- Deglaze the caramel with the hot cream and cut the heat.
- Whisk in the passion fruit purée, salt, butter, and egg yolks.
- Place the two chocolates into a mixing bowl and strain the hot preparation over the top.
- Add the gelatin, and then emulsify using the immersion blender. The preparation should be completely smooth and shiny with no lumps or graininess.
- Once satisfied with the texture of the crémeux, transfer it into a mixing bowl, cover with plastic film touching the surface, and allow to cool.
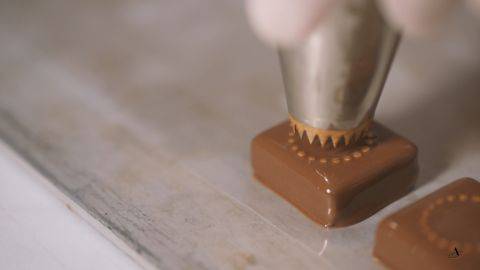
- When the caramel is cool enough to handle, transfer it into a piping bag and pipe 80 g (2.8 oz) over the banana and passion fruit crémeux.
- Finally, top with the disc of banana bread and place in the freezer until solid
Chocolate and Hazelnut Crispy
Ingredients: Chocolate and Hazelnut Crispy
Preparation: Chocolate and Hazelnut Crispy
- Add the Pailleté Feuilletine™, hazelnut Bresilienne, and praliné to the melted chocolate in a mixing bowl, and mix until all the ingredients are well incorporated.
- Pour the preparation onto a plastic sheet and cover with a second sheet of plastic.
- Using a rolling pin, roll the crispy to 3 mm (0.12”) thick. For large-scale production, you can use a dough sheeter for this step.
- Place in the fridge until the chocolate starts to set.
- Remove from the fridge and peel off both plastic sheets.
- Using the 7 cm (2.8”) and 16 cm (6.3”) ring cutters and a knife, cut discs of crispy with the center removed, similar to the banana bread.
- Freeze the rounds of crispy until you are ready for the “Pre-assembly” step.
View tools
- Metal Tray
- Knife
- Microwave
- Offset spatula
- Mixing bowl (s)
- Palette knife
- Rolling pin
- Plastic Sheets
- Ring cutters: 7 cm (2.8”) and 16 cm (6.3”)
- Spatula(s)
Pâte à bombe
Ingredients: Pâte à bombe
-
73 gwater
-
118 gsugar
-
118 gegg yolks
Preparation: Pâte à bombe
- Heat the water, the sugar, and egg yolks to 82°C (180°F) in the Thermomix® or over a water bath.
- Transfer into a mixing bowl and whip on high speed until the preparation holds stiff peaks.
- Scale 215 g (7.6 oz) and use immediately in the mousse.
View tools
- Tabletop mixer, mixing bowl and a whisk
- Thermomix®
- Spatula(s)
Sao Thomé Dark Chocolate Mousse
Ingredients: Sao Thomé Dark Chocolate Mousse
-
215 gpâte à bombe
-
115 gHeavy Cream, 35% fat #1
-
390 gHeavy Cream, 35% fat #2
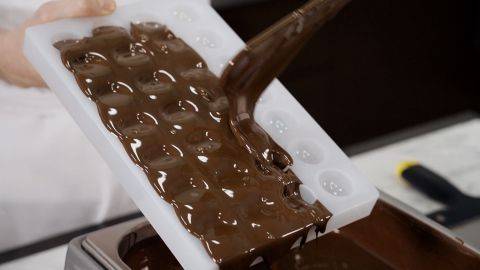
Preparation: Sao Thomé Dark Chocolate Mousse
- Whip the first quantity of cream on high speed until the preparation holds soft peaks. Set aside.
- Bring the second quantity of cream to a boil.
- Once boiling, pour the cream over the melted chocolate and mix to obtain a smooth ganache that should be at 45°C (113°F).
- Once at 45°C (113°F), add to the pâte à bombe and barely mix it. Do not overmix the preparation before adding the whipped cream.
- Pour in the whipped cream and mix until fully incorporated and completely smooth.
View tools
- Cooktop
- Saucepan
- Microwave
- Piping Bag
- Scissors
- Mixing bowl (s)
- Scale
- Infrared Thermometer
- Tabletop mixer, mixing bowl and a whisk
- Spatula(s)
Pre-Assembly
- Transfer the mousse into a piping bag and cut a large tip.
- Immediately pipe the mold 1/3 full and tap the mold to make sure it is evenly filled.
- Using a palette knife, spread the mousse evenly up the sides and in the bottom of the mold to ensure that there are no air bubbles.
- Pipe an additional layer of mousse and tap on the tabletop to make sure the preparation is evenly spread out.
- Then take the frozen filling insert and press it into the mousse.
- Rotate the insert a little to make sure there are no air bubbles.
- Cover the filling with an extra layer of mousse and smooth with an offset spatula.
- Place the frozen crispy on top and gently press it into the mousse. Remove any excess mouse using an offset spatula.
- Be sure to move the offset spatula towards the outside of the mold rather than towards the inside as you remove the excess mousse. This will make the glazing process easier and prevent the crispy from becoming soggy.
- Place back in the freezer until the solid.
View tools
- Metal Tray
- Offset spatula
- Silicone Savarin Mold: 18 cm (7”) circumference
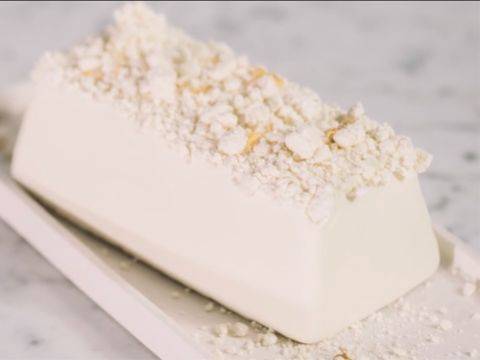
Spraying Mixture
Ingredients: Spraying Mixture
-
200 gNCB-HDO3
Preparation: Spraying Mixture
- Melt the cocoa butter and pour it over the chocolate.
- Mix until completely smooth, without any lumps.
- Reserve the mixture in a hot box until ready to use.
View tools
- Cooktop
- Saucepan
- Spatula(s)
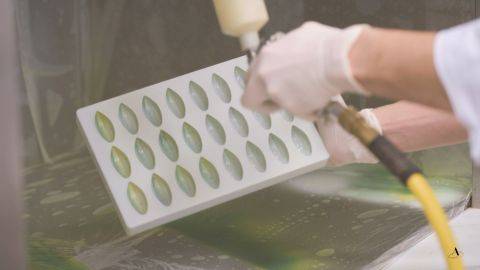
Dark Chocolate Leaves
Ingredients: Dark Chocolate Leaves
-
Pure alcohol 94%
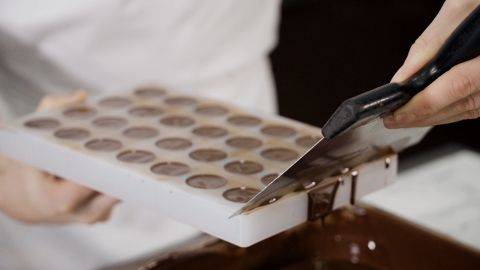
Preparation: Dark Chocolate Leaves
- Use pure alcohol to secure a plastic sheet to the marble.
- Ladle some pre-crystallized dark chocolate onto the sheet, and spread with an offset spatula so that you have a thin, even layer.
- Use the two different sized cutters to create the leaf-shaped decorations.
- Flip the chocolate-covered sheet over onto a metal tray lined with a plastic sheet. Cover the sheet with a second metal tray. This will prevent the chocolate from contracting.
- Let set at 18-20°C (64-68°F) or place in a fridge set at around 15°C (59°F.)
- Once the chocolate has set, gently remove the dark chocolate leaves from the plastic sheet, and place them on a metal tray lined with parchment paper.
View tools
- Metal Tray
- Parchment paper
- Offset spatula
- Ladle
- Plastic Sheets
- Small and medium size leaf-shaped cutters
- Spatula(s)
Green Chocolate Leaves
Ingredients: Green Chocolate Leaves
-
Q.S.Pure alcohol 94%
-
55 gIBC Green cocoa butter #1
-
15 gIBC White cocoa butter #1
-
57 gIBC Green cocoa butter #2
-
10 gIBC White cocoa butter #2
Preparation: Green Chocolate Leaves
- Use pure alcohol to secure a plastic sheet to a metal tray..
- Mix the first quantities of green and white cocoa butter to create a light green cocoa butter.
- With a brush, spread the preparation of light green cocoa butter onto the metal tray lined with a plastic sheet. Allow to set.
- Then, using the brush, completely cover the first layer of cocoa butter with the second quantity of green cocoa butter. Let it set.
- Apply a layer of white cocoa butter (#2) and let it set as well.
- Always make sure that the cocoa butter is at 28°C (82°F) before applying it.
- Pour the pre-crystallized chocolate over the set layers of cocoa butter and, using an offset spatula, spread the chocolate into a thin and even layer that covers cocoa butter layers completely. Remove the sheet from the tray and allow the chocolate to set.
- Use the two different sized cutters to create the leaf-shaped decorations.
- Flip over onto the metal tray lined with a plastic sheet and cover with a second metal tray. This will prevent the chocolate from contracting.
- Let set at 18-20°C (64-68°F) or place in a fridge set at around 15°C (59°F.)
- Once the chocolate has set completely, gently remove the dark chocolate leaves from the plastic sheet, and place them on a metal tray lined with parchment paper.
View tools
- Metal Tray
- Parchment paper
- Offset spatula
- Ladle
- Plastic Sheets
- Small and medium size leaf-shaped cutters
Cocoa Glaze
Ingredients: Cocoa Glaze
-
160 gHeavy cream 35% fat
-
100 gglucose syrup
-
60 gCP
-
100 gwater
-
210 gsugar
-
65 gGelatin mass (1:5 gelatin powder 200 bloom: water)
Preparation: Cocoa Glaze
- Bring the cream, glucose and cocoa powder to a boil.
- Cook the water and sugar to 115°C (239°F).
- Once the sugar syrup has reached 115°C (239°F), whisk in the hot cream mixture.
- Strain the glaze into a bowl, pressing it through the strainer with a spatula to ensure that all the cocoa powder passes through into the glaze.
- Cool the glaze down to 70°C (158°F), and add the gelatin mass. Mix well using an immersion blender. It is important to let the glaze cool down to 70°C (158°F) or below before adding the gelatin mass in order to avoid air bubbles.
- The glaze should be very smooth without any lumps. Check the temperature: the glaze should be at 35°C (95°F) for use.
- Transfer the glaze into a piping bag for immediate use in the final assembly.
View tools
- Cooktop
- Saucepan
- Thermometer
- Immersion blender
- Piping Bag
- Scissors
- Infrared Thermometer
- Spatula(s)
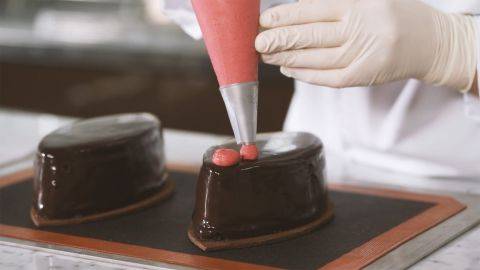
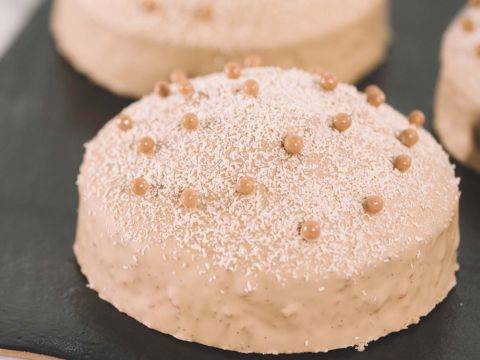
Final Assembly
- Remove the cake from the freezer and carefully unmold it.
- Use two knives to draw perpendicular lines on 1/4 of the cake.
- You could also use a metal brush to create these lines.
- Place the cake back into the freezer until you are ready to spray it.
- Transfer the spraying mixture into the spray gun and immediately spray the frozen cake*. Spray only the part with the lines. Remember to keep the same distance and angle between the frozen cake and the spray gun in order to have an even application of color.
- Then glaze the cake, avoiding the portion with the lines.
- Use a knife to remove any excess glaze from the bottom and place the cake on a platter.
- Lastly, place the leaves (all facing the same direction) on the glazed part of the cake, varying the color of the leaves to create visual interest.
- *Make sure the cake is well-frozen otherwise you will not obtain a velvet texture. For more information about the velvet effect, refer to our previous courses.
View tools
- Metal Tray
- Parchment paper
- Offset spatula
- Cake ring
- Knives or metal brush
Facing Problems with your Creations?
- Find troubleshooting guides & tutorials
- Chat live with an advisor chef and find the right solution to your challenges


Comments