
Medium
Makes: 1 Yield
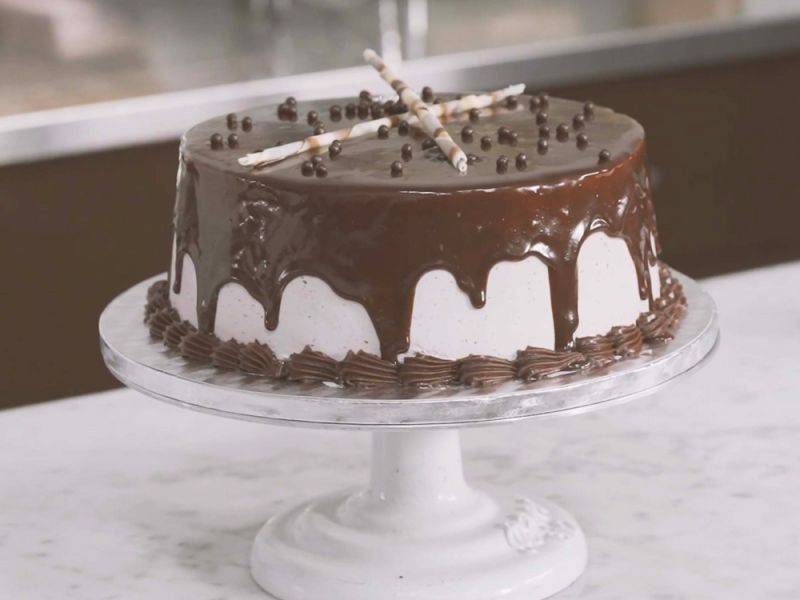
This cake is inspired by the French Kir Royal which is champagne mixed with a blackcurrant liqueur. Blackcurrant is a great flavor to celebrate, whether it is a birthday or any other occasion.This cake is inspired by the French Kir Royal which is champagne mixed with a blackcurrant liqueur. Blackcurrant is a great flavor to celebrate, whether it is a birthday or any other occasion.This cake is inspired by the French Kir Royal which is champagne mixed with a blackcurrant liqueur. Blackcurrant is a gr...
- Shelf life:
- 3 days
- Conservation:
- Room temperature at 18°C - 20°C
Containing: 6 Components

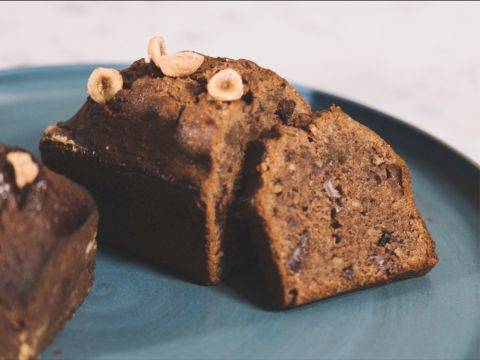
Chocolate Almond Cake
Ingredients: Chocolate Almond Cake
-
4.4 ozAll purpose flour
-
0.4 ozbaking powder
-
2.0 ozButter #1
-
12.3 ozEggs, whole
-
8.8 ozegg whites
-
7.1 ozsugar
-
2.0 ozButter #2
-
2.6 ozAlmonds, chopped and roasted
Preparation: Chocolate Almond Cake
- Spray the cake rings lightly with cooking spray and place them on a silpat lined tray.
- Sift together the flour, cocoa powder, and baking powder and set aside.
- Combine the almond paste with the first quantity of butter in the mixer and use the paddle attachment to mix well until completely combined. This will take a few minutes on low speed.
- While the almond paste and butter are mixing, heat the chocolate and the second quantity of butter in a microwave until just melted, and then set aside to cool slightly.
- Once the almond paste and butter are well combined in the mixer, slowly add the room temperature eggs in several increments on low speed until all of the eggs have been added and the mixture is homogeneous. Stop periodically to scrape the bowl as needed to ensure even mixing of the ingredients. Remove from the mixer and set aside.
- Using a perfectly clean mixer bowl and whip, combine the egg whites and sugar together and whip on medium-high speed until the meringue holds medium peaks.
- While the meringue is whipping, stir the melted butter and chocolate into the almond paste mixture by hand until it is smooth and homogeneous.
- Ensure the meringue has the proper texture and holds a medium peak.
- When the meringue is almost to the correct texture, stop the mixer and finish whipping by hand with a whisk to avoid overwhipping the meringue.
- Mix a small portion of meringue into a small portion of the chocolate and almond mixture to lighten the batter.
- Almost completely incorporate this small portion into the remaining chocolate and almond mixture. Do not fully incorporate this to avoid overmixing.
- When the first portion is almost completely incorporated, add one third of the remaining meringue to the creamed mixture. Be sure to add enough of the meringue so the base is moist enough to absorb the dry ingredients.
- Gently fold the dry ingredients into the batter in several increments. Ensure the dry ingredients do not gather in the bottom of the bowl by scraping well to the bottom of the bowl and also cleaning the batter off the spatula from time to time. It is not necessary to completely incorporate the dry ingredients into the batter before proceeding, as they will continue to be mixed as we add the remaining meringue.
- Add the remaining meringue into the base. Once most of the meringue has been incorporated into the batter, begin adding the chopped almonds in 3 to 4 increments to distribute them evenly. Avoid overmixing of the batter, especially near the end to ensure the cake is light and soft.
- Weigh the mixture and divide it equally in half, and then deposit the batter into the prepared cake rings. Bake at 149°C (300°F) for about 25 minutes, just until the cakes start to pull away from the cake ring and a toothpick inserted into the center of the cake comes out clean.
- Remove the cakes from the oven and allow it to cool for a few minutes, as the cakes will begin to contract away from the cake ring.
- After a few moments, remove the cake rings and allow the cakes to continue cooling. If the cakes are inverted too quickly, this can cause the cakes to crack.
- When the cakes have cooled sufficiently, but are still warm, invert them onto a cooling rack, remove the silpat and allow the cakes to cool completely to room temperature.
- After cooling, the cakes can be wrapped in plastic film and frozen for up to 1 month, or you can proceed with building the cake.
View tools
- Whisk
- Microwave
- Bowl(s)
- Parchment paper
- Mixing bowl (s)
- Scale
- Rack
- Silpat
- Small offset spatula
- Metal Tray (s)
- Tabletop mixer, mixing bowl, a paddle attachment and a whisk
- 23 cm x 4 cm (8.7” x 1.6”) cake ring
- Toothpick
- Spatula(s)
- Sifter
Cassis Ganache
Ingredients: Cassis Ganache
-
7.1 ozHeavy cream 35% fat
-
6.5 ozsugar
-
2.6 ozglucose syrup
-
0.5 ozhoney
-
2.5 ozunsalted butter
-
3.5 ozblackcurrant puree
-
0.7 ozcreme de cassis
Preparation: Cassis Ganache
- Combine the heavy cream, glucose syrup, honey, sugar, and soft butter in a medium saucepan and warm over low heat until it reaches 50°C (122°F).
- Meanwhile, melt the chocolate slowly in the microwave to 45°C (113°F).
- Warm the blackcurrant purée to 30°C (86°F) and add to the melted chocolate. Stir well from the center of the bowl outwards to form an emulsion.
- Once the emulsion is started, add the warm cream mixture and whisk from the center outwards to fully incorporate the cream mixture into the chocolate mixture.
- Once the ganache is smooth, pour in the liqueur and whisk well to combine.
- Finally, blend the ganache using an immersion blender to ensure the ganache is completely smooth and well emulsified.
- Cover the ganache with plastic film and allow it to crystallize to a spreadable texture, usually 3 to 4 hours.
- This ganache can be made well in advance and stored in the refrigerator for up to 3 days before using.
- Allow the ganache to return to room temperature before using as the filling for the cake.
View tools
- Cooktop
- Whisk
- Immersion blender
- Microwave
- Bowl(s)
- Mixing bowl (s)
- Plastic film
- Infrared Thermometer
- Saucepans
- Spatula(s)
Blackcurrant and White Chocolate Buttercream
Ingredients: Blackcurrant and White Chocolate Buttercream
-
1.0 lbEgg Whites
-
1.5 lbsugar
-
0.4 ozVanilla bean paste
-
2.6 lbButter, Softened
-
4.8 ozblackcurrant puree
-
1.1 ozCrème de Cassis (optional)
Preparation: Blackcurrant and White Chocolate Buttercream
- Gently whisk the egg whites and sugar in a perfectly clean bowl over simmering water until the sugar is dissolved. Be careful not to incorporate too much air at this stage.
- The mixture should reach 60°C (140°F).
- Transfer the warmed egg white mixture to a perfectly clean mixer bowl and, using the whip attachment, whip on medium speed to release the steam, and then slowly begin increasing the speed. As air is incorporated into the mixer and it thickens, you can whip the mixture faster without it being ejected from the bowl. When you begin to see the lines from the whip in the meringue, it is approaching the correct texture.
- Whip on high speed until firm peaks are achieved. This will take several minutes.
- While the meringue is whipping, the white chocolate can be gently melted in the microwave to 40°C (104°F).
- Returning to the meringue, the correct texture is achieved when the meringue is lifted out of the bowl, a medium to firm peak stays in place on the tip of the whisk.
- Once the correct texture is achieved, add in the vanilla bean paste and return to the mixer and whisk it on low speed. The bowl should no longer feel warm and should be at cool room temperature.
- Place the soft butter in a separate mixer bowl and cream it on medium speed using the paddle attachment until light and smooth. It should have a spreadable texture.
- Place the paddle from the butter into the meringue and return this bowl to the mixer. Turn the mixer on low speed.
- Using a gloved hand, slowly add all of the soft butter to the meringue while the mixer is running on low speed.
- As more butter is added to the meringue base, the mixture may appear to split or curdle; do not worry as this is normal. As the butter continues to become incorporated, the mixture will become smooth.
- If needed, you can use small bursts of heat from a blow torch or a heat gun to warm the mixture to aid in the incorporation of the butter if the mixture is becoming too cold.
- Remove the bowl from the mixer and scrape well using a spatula all the way to the bottom of the bowl to ensure the buttercream is fully homogenized. Return the bowl to the mixer.
- Warm the purée to 30°C (86°F) in the microwave and add it to the previously melted white chocolate.
- Stir from the center outward to form an emulsion and continue stirring the ganache until it is completely smooth and homogeneous.
- Slowly add the blackcurrant ganache into the buttercream while the mixer is running on low speed.
- Stop the mixer and again scrape the bowl well to ensure the mixture is smooth and uniform.
- Return to the mixer and, if desired, add in the liqueur, which is optional, but does enhance the flavor of the finished buttercream.
- At this point, the buttercream is ready to use. You can continue to whip it longer, if desired, to have a lighter and fluffier texture, which is often desired if the buttercream is to be piped as a final decoration. If not using immediately, the buttercream can be stored, well protected in a food safe container at room temperature for up to 2 days. It can be refrigerated for up to 7 days or frozen for one month.
View tools
- Cooktop
- Saucepan
- Whisk
- Microwave
- Bowl(s)
- Gloves
- Mixing bowl (s)
- Infrared Thermometer
- Torch
- Small offset spatula
- Tabletop mixer, mixing bowl, paddle and whip attachments
- Spatula(s)
Cake Assembly and Crumb Coating
Ingredients: Cake Assembly and Crumb Coating
-
Q.S.Simple syrup 1:1
Preparation: Cake Assembly and Crumb Coating
- Line your work surface in plastic film to make cleanup easier.
- Place a small amount of cassis ganache on a cake cardboard and set the first cake layer on top of it. Use just enough ganache to adhere the cake to the board.
- Level the cake layer by trimming the top using a serrated knife.
- Trim and level the second cake layer in the same fashion.
- Slowly brush the first cake layer with room temperature simple syrup allowing it to soak into the cake layer.
- Prepare your piping bag by placing the coupler inside the piping bag and trimming the tip of the piping bag to fit the coupler.
- Fill the piping bag with the prepared buttercream and pipe a dam around the outer edge of the cake.
- Spread the blackcurrant ganache evenly inside the dam, being careful not to overfill as this will make cutting the cake difficult.
- Invert your second cake layer and gently place it on top of the prepared bottom layer. Press the top layer with the cake board to ensure it is flat.
- Slowly brush the top cake layer with room temperature simple syrup allowing it to soak into the cake layer.
- Starting with the sides of the cake, spread a thin layer of buttercream all around the cake. You will be able to see the cake through this thin skim coat. This is fine as the purpose of the crumb coat is to trap the loose crumbs and fill in any uneven areas of the cake.
- Place the crumb coated cake into the refrigerator for about 20 minutes to solidify the crumb coat.
View tools
- Tall recipient
- Piping Bag
- Scissors
- Scraper
- Bowl(s)
- Paper towel
- Plastic film
- Brush
- Large offset spatula
- Small offset spatula
- Serrated knife
- Cake turntable
- Marker
- Cake cardboards
- Piping bag coupler
Final Coating
- Finish icing the cake with the blackcurrant buttercream using an offset spatula.
- Start on the sides of the cake so that you can ensure the cake has an even layer of buttercream all the way around. If you ice the top of the cake first, you will not be able to see how much buttercream is on the sides of the cake.
- Once you have applied an even coating of buttercream to the side of the cake, smooth it using the offset spatula and fill in any gaps or low places.
- Then, ice the top of the cake, trying to match the thickness of the buttercream with that on the sides of the cake.
- Using a bench scraper, follow the cardboard at the base of the cake to perfectly smooth the buttercream on the sides of the cake.
- Use the bench scraper to also smooth the top of the cake.
- Spot check the cake, and if needed, fill in any remaining gaps with more buttercream using the offset spatula.
- Once the buttercream is even on the cake, clean your offset spatula well and then place it briefly into warm water and then dry it.
- Use the warmed spatula to do the final smoothing of the buttercream and remove any small excess amounts that might still be present.
- After finishing, any remaining buttercream can be used to fill or crumb coat future cakes.
- Place a small amount of cassis ganache on the cake display board and set the finished iced cake on top of it. Use just enough ganache to adhere the cake to the board.
- Transfer the iced cake to its final presentation board using two clean offset spatulas by placing them underneath the cake cardboard and gently lifting it off the cake turntable and setting it onto the prepared presentation board.
View tools
- Cooktop
- Saucepan
- Paper towel
- Large offset spatula
- Cake turntable
- Bench scraper
- Cake presentation board
Decorating the Cake
Ingredients: Decorating the Cake
Preparation: Decorating the Cake
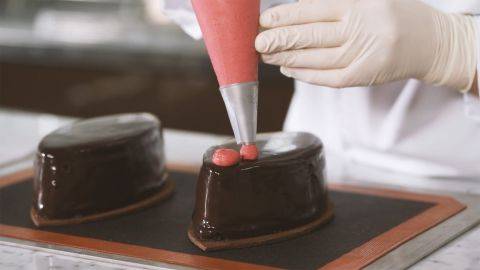
- If needed, warm the ganache gently in the microwave until a correct piping fluidity is achieved, between 30-32°C (86-90°F). The warmer the ganache the more liquid it will be, which will determine the look of the final decoration.
- Test the fluidity of the ganache on the side of the container to gage its fluidity on the cake.
- Pour the warm ganache into a piping bag and cut a small opening in the tip of the bag.
- Quickly pipe the ganache along the top edge of the cake, letting it drip down the sides in an attractive manner.
- Then pipe ganache onto the top of the cake and quickly spread it uniformly on top of the cake with an offset spatula. Do this step quickly as the cold buttercream will make the ganache set fast.
- Allow this ganache to solidify on the cake for several minutes before garnishing.
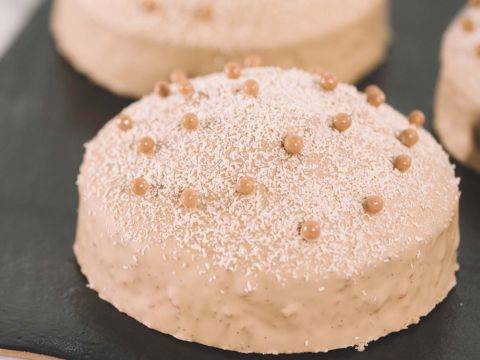
- In the meantime, place some chilled blackcurrant ganache into a piping bag fitted with an open star tip and use it to pipe a decorative border around the bottom edge of the cake.
- Once the ganache on the cake has solidified, sprinkle the dark chocolate crispearls on top of the cake.
- Decoratively arrange some marbled chocolate pencils on top of the cake.
View tools
- Tall recipient
- Thermometer
- Microwave
- Scissors
- Scraper
- Offset spatula
- Bowl (s)
- Piping Bag (s)
- Cake turntable
- Piping tip C8 (open star tip)
Facing Problems with your Creations?
- Find troubleshooting guides & tutorials
- Chat live with an advisor chef and find the right solution to your challenges


Comments