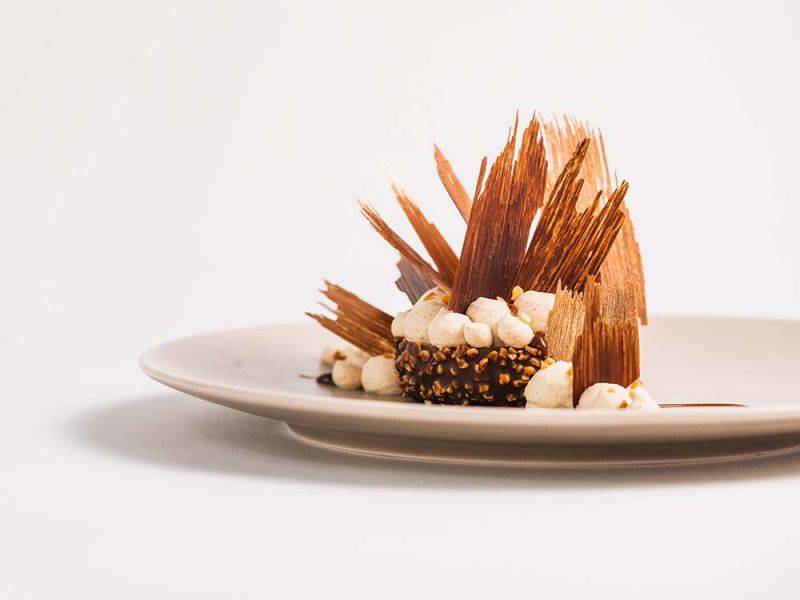
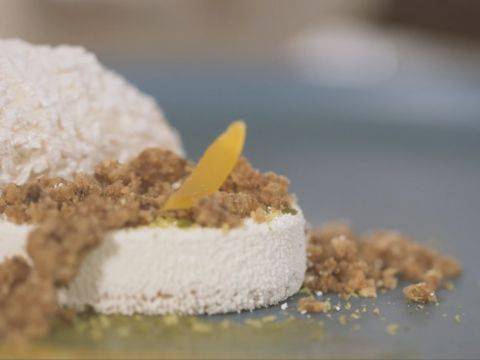
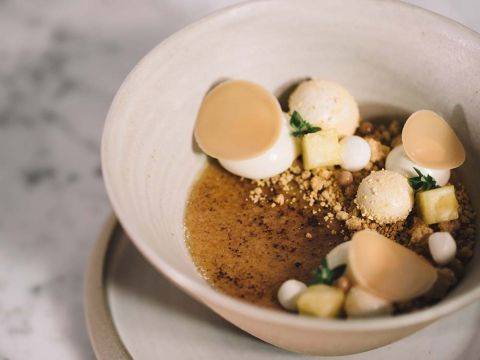
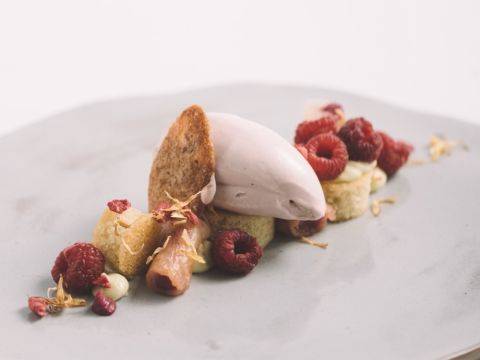
Chef Marike has created a plated dessert that is innovative and elegant, yet approachable. The classic combination of a brownie and ice cream has never looked so chic! This updated version includes a silky chocolate mousse, crunchy hazelnuts, and a chocolate ice cream with nuances of caramel. The variety of flavors and textures as well as the unexpected shapes make this a plated dessert that will be at home in any setting, from casual to upscale. There are several components here, but Chef Marike’s approach will help you stay organized, and you’ll find that everything can be prepared in just a few hours. The components lend themselves well to personal adaptations and to use in other formats. While impressive and sophisticated, at its heart this dessert encapsulates a basic primer to a successful plated dessert: a variety of shapes, textures, temperatures, and flavors arranged in a way that helps guests take a new look at an old favorite.Chef Marike has created a plated dessert that is innovative and elegant, yet approachable. The classic combination of a brownie and ice cream has never looked so chic! This updated version includes a silky chocolate mousse, crunchy hazelnuts, and a chocolate ice cream with nuances of caramel. The variety of flavors and textures as well as the unexpected shapes make this a plated dessert that will be at home in any setting, from casual to upscale. There are several components here, but Chef Marike’s approach will help you stay organized, and you’ll find that everything can be prepared in just a few hours. The components lend themselves well to personal adaptations and to use in other formats. While impressive and sophisticated, at its heart this dessert encapsulates a basic primer to a successful plated dessert: a variety of shapes, textures, temperatures, and flavors arranged in a way that helps guests take a new look at an old favorite.Chef Marike has created a plated dessert that is innovative and elegant, yet approachable. The classic combination of a ...
- Shelf life:
- 1 day
- Conservation:
- Varies by component
Containing: 9 Components

Brownie
Ingredients: Brownie
-
5.6 ozEggs, whole
-
4.2 ozDark brown sugar
-
4.2 ozsugar
-
6.3 ozButter, melted
-
0.5 ozCP
-
1.4 ozAll purpose flour
-
3.5 oz
-
0.1 ozSmoked sea salt
Preparation: Brownie
- Begin by placing the eggs and the sugars into the bowl of a tabletop mixer and mix with a paddle attachment until well combined.
- While the eggs and sugar are mixing, pour the melted chocolate into the melted butter and whisk well.
- Once the eggs and sugars are thoroughly mixed, add the butter and chocolate mixture. Stop and scrape the bowl to ensure everything is thoroughly incorporated. Combine the cocoa powder with the flour, and then add this to the mixing bowl. Add the chopped pecans and mix again. Scrape the bowl again to ensure the batter is smooth.
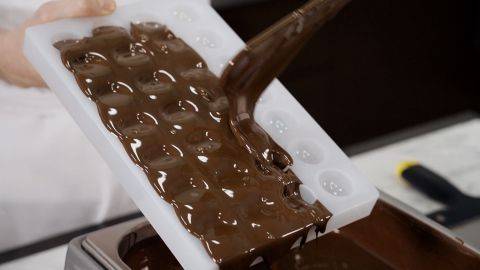
- Spread the batter out in the square frame placed on a metal tray lined with a silicone mat. Sprinkle the smoked sea salt on top of the batter.
- Place the tray in the oven and bake at 165°C (329°F) for about 15 minutes.
- Remove from the oven and allow the brownies to cool completely to room temperature.
- Once cooled, unmold the brownie onto parchment paper by cutting around the frame using a knife.
- Cut rounds out of the brownie using the metal ring cutter.
- Place the cut brownies into the silicone mold and reserve at room temperature until needed.
View tools
- Whisk
- Bowl(s)
- Parchment paper
- Offset spatula
- Silicone mat
- Small offset spatula
- Metal Tray (s)
- Tabletop mixer, mixing bowl and a paddle attachment
- Spatula
- Square frame 36 cm(14”) x 27 cm (10.6”) 800g (28.2 oz)
- 4 cm diameter Ring Cutter
- 6.5 cm (2.56”) diameter silicone mold
Pâté à Bombe
Ingredients: Pâté à Bombe
-
4.2 ozegg yolks
-
2.6 ozwater
-
4.2 ozsugar
Preparation: Pâté à Bombe
- Combine all of the ingredients in the Thermomix® and cook until it reaches 82°C (180°F).
- Pour the mixture into the bowl of a tabletop mixer.
- Using the whisk attachment, whip the mixture on high speed until it has cooled to room temperature.
- Scale 75g (2.6 oz) of the pâté à bombe into a mixing bowl.
- Reserve for use in the dark chocolate mousse.
View tools
- Bowl(s)
- Mixing bowl (s)
- Scale
- Thermomix® or food processor
- Tabletop mixer, mixing bowl and a whisk
- Spatula
Dark Chocolate Mousse
Ingredients: Dark Chocolate Mousse
-
4.9 ozHeavy cream 35% fat #1
-
2.8 ozHeavy cream 35% fat #2
-
2.6 ozpâte à bombe
Preparation: Dark Chocolate Mousse
- Using a tabletop mixer with a whisk attachment, whip the first quantity of cream until it holds soft peaks. Reserve at room temperature while preparing the remaining mousse ingredients.
- Warm up the second quantity of cream to 70°C (158°F) in a saucepan, then pour about 1/3 of the hot cream over the chocolate in a mixing bowl and mix well using a spatula. Add the rest of the cream and mix well until completely smooth. Add the hazelnut paste and mix again to incorporate. Now gently fold in the pâté à bombe.
- Pour the preparation into the whipped cream and fold together until fully incorporated.
- Transfer the finished mousse into a piping bag using a ladle. Cut a small opening at the tip of the bag.
- Pipe some chocolate mousse around the brownies as well as a small amount on top of each brownie. Tap the mold gently on the table to flatten the mousse evenly in the mold.
- Place the preparation in the freezer until completely frozen.
- Once well-frozen, unmold the mousse-enrobed brownies and place them on a metal tray lined with parchment paper.
- Place a wooden or metal stick in the center of the mousse and then store in the freezer until the dipping step.
View tools
- Cooktop
- Saucepan
- Metal Tray
- Whisk
- Thermometer
- Piping Bag
- Scissors
- Bowl(s)
- Parchment paper
- Gloves
- Ladle
- Wooden Skewers
- Spatula
Whipped Hazelnut Cream
Ingredients: Whipped Hazelnut Cream
-
3.5 ozHeavy cream 35% fat #1
-
0.4 ozinverted sugar
-
0.4 ozglucose syrup DE 38
-
0.6 ozNCB-HDO3
-
5.3 ozHeavy cream 35% fat #2
Preparation: Whipped Hazelnut Cream
- Bring the first amount of cream, inverted sugar, and glucose to a boil in a saucepan. Once boiling, pour over the cocoa butter in a tall recipient, then add the hazelnut paste and the second amount of cream. Blend everything together until perfectly smooth using an immersion blender.
- Transfer the mixture into a bowl, cover with plastic film, and reserve in the refrigerator for at least 12 hours before whipping.
- Once completely chilled, whip the cream using a tabletop mixer with a whisk.
- Transfer the whipped hazelnut cream into a piping bag fitted with an 8mm (.3”) tip.
- Reserve in the refrigerator until needed for assembly.
View tools
- Cooktop
- Saucepan
- Whisk
- Tall recipient
- Immersion blender
- Bowl(s)
- Plastic film
- Piping bag & 8 mm (0.3”) tip
- Tabletop mixer, mixing bowl and a whisk
- Spatula
Caramel
Ingredients: Caramel
-
8.8 ozHeavy cream 35% fat
-
1.3 ozglucose syrup DE 38
-
7.9 ozSugar
-
1.4 ozegg yolks
-
0.9 ozGelatin mass (1:5 gelatin powder 200 bloom + water)
-
2.5 ozbutter
-
0.1 ozSmoked sea salt
-
1.4 ozyuzu juice
Preparation: Caramel
- Bring the cream to a boil in a saucepan and then reserve on the table.
- In another saucepan, melt the glucose over medium-high heat. Add the sugar to the glucose and cook until reaching a deep caramel color. Do not stir the caramel too much as it cooks, as this may cause it to become grainy.
- Turn off the heat once the caramel has reached the desired color, then deglaze slowly with the hot cream while stirring with a spatula. Perform this step gently to avoid the caramel boiling violently.
- Pour a small amount of the resulting caramel over the egg yolks to temper them. Add this egg yolk and caramel mixture back to the saucepan and bring the mixture to 82°C (180°F), then remove from the heat. Add the gelatin mass and the butter. Let it melt completely and whisk until completely smooth and combined.
- Pour the chocolates and salt into a tall recipient.
- Strain the cooked caramel over the chocolates and salt.
- Mix using an immersion blender and add the yuzu juice while continuing to mix.
- Pour into a bowl and cover with plastic film. Place in the refrigerator to cool completely.
- Once cooled, transfer into a piping bag, and reserve in the refrigerator for assembly of the dessert.
View tools
- Cooktop
- Saucepan
- Whisk
- Tall recipient
- Immersion blender
- Piping Bag
- Bowl(s)
- Plastic film
- Spoon
- Spatula
- Sieve
Caramelized Chocolate Ice Cream
Ingredients: Caramelized Chocolate Ice Cream
-
2.2 lbWhole milk
-
1.6 ozmilk powder
-
3.2 ozglucose syrup DE 38
-
2.8 ozSugar #1
-
0.2 ozstabilizer
-
0.4 ozSugar #2
Preparation: Caramelized Chocolate Ice Cream
- Bring the milk and milk powder to a boil and whisk a little. Set aside.
- Make a caramel with the glucose and the first amount of sugar. Cook to a deep caramel color. While the caramel cooks, mix the stabilizer with sugar using a spoon.
- Once the caramel is the desired color, turn off the heat and deglaze the caramel with the hot milk. Add the stabilizer and sugar and bring to a boil. Check the bottom of the saucepan using a whisk to make sure that all the caramel has melted.
- Once the mixture is boiling, and all the caramel has dissolved, pour the mixture over the chocolate. Mix well using an immersion blender.
- Process according to the directions for your ice cream machine. When the ice cream is ready, deposit into a container and keep it in the freezer until the final assembly.
View tools
- Cooktop
- Saucepan
- Whisk
- Tall recipient
- Immersion blender
- Bowl(s)
- Spoon
- Spatula
Chocolate Decorations
Ingredients: Chocolate Decorations
-
2665NV
-
IBC Creative Bronze Powder
-
Cooking Spray
Preparation: Chocolate Decorations
- Spray a metal tray lightly with cooking spray, remove the excess using a paper towel, and attach a guitar sheet to the tray. Make sure to remove any air bubbles underneath the sheet using a scraper.
- Using a brush, spread some of the pre-crystallized milk chocolate on the guitar sheet.
- Repeat the same process with the pre-crystallized dark chocolate on another tray prepared in the same manner.
- Let the chocolate fully crystallize at room temperature.
- Once set, using a makeup brush, spread some bronze powder onto the milk chocolate, and let set a few minutes.
- Place another guitar sheet on top of the milk chocolate, turn upside down and remove the guitar sheet on top. Repeat the process with the dark chocolate.
- Let set at room temperature until final assembly. (For hot weather, you may need to place the chocolate sheets in the refrigerator before unmolding)
View tools
- Bowl scraper
- Bowl(s)
- Paper towel
- Brush
- Metal Tray (s)
- Guitar sheet
- Makeup brush
Chocolate Dipping Glaze
Ingredients: Chocolate Dipping Glaze
-
7.1 ozNCB-HDO3
Preparation: Chocolate Dipping Glaze
- Melt the cocoa butter in a saucepan, then pour onto the melted chocolate. Transfer the mixture to a tall recipient and mix together, then add the hazelnut praliné grains.
- Let the glaze cool down to around 30°C (86°F) before using.
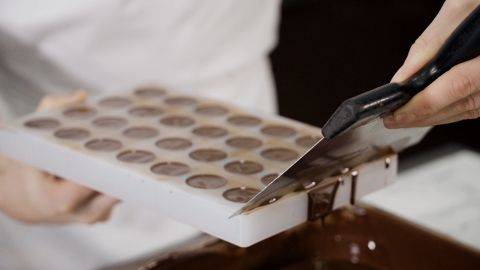
- Attach a guitar sheet to a metal tray, and have another guitar sheet ready on the side for cleaning the dipped mousse.
- Dip the mousse into the glaze just up to the top, clean the excess glaze off on a guitar sheet, and then place the dipped mousse on a metal tray lined with a guitar sheet.
- Remove the wooden skewers by twisting them slightly.
- Reserve in the refrigerator until the final assembly.
View tools
- Cooktop
- Saucepan
- Metal Tray
- Tall recipient
- Thermometer
- Bowl(s)
- Guitar sheets
- Spatula
Assembly
- Pipe a line of caramel attractively on the plate.
- Pipe a dot of hazelnut cream on the plate and set the brownie on it to adhere it to the plate.
- Pipe dots of hazelnut cream on one side of the top of the dipped brownie and also on the plate using the 10 mm tip. Then hold the 8 mm (.3”) tip over the 10 mm tip in order to quickly pipe different sizes on the plate. Repeat with the 5 mm tip.
- Pipe some caramel dots on top of the brownie and plate.
- Sprinkle praliné grains on top of the piped cream and on the brownie where you will place the ice cream.
- Place a quenelle of ice cream on top of the brownie.
- Lastly, break the chocolate decorations into attractive pieces and place them randomly around the dessert, making sure to give an interesting look.
View tools
- Piping Bag
- Scissors
- Bowl(s)
- Offset spatula
- Gloves
- Spoon
- 10mm (0.39”) piping tip
- 9 mm (0.3”) piping tip
- 6 mm (0.2”) piping tip
Facing Problems with your Creations?
- Find troubleshooting guides & tutorials
- Chat live with an advisor chef and find the right solution to your challenges


Comments