
Easy
Makes: 2 Yield
The Galette des Rois is a French tradition that happens each year on January 6th. The galette is baked with an edible “fève” inside.The Galette des Rois is a French tradition that happens each year on January 6th. The galette is baked with an edible “fève” inside.The Galette des Rois is a French tradition that happens each year on January 6th. The galette is baked with an edible “f...
- Shelf life:
- 3 days
- Conservation:
- Room temperature
Containing: 4 Components


Reversed Puff Pastry
Ingredients: Reversed Puff Pastry
-
10.6 ozbutter
-
4.6 ozAll purpose flour
-
9.2 ozAll purpose flour
-
4.6 ozwater
-
0.4 ozSůl
-
2.6 ozButter, Softened
-
All purpose flour
Preparation: Reversed Puff Pastry
- In a tabletop mixer with a hook attachment, mix together the cubed butter and 130g (4.6 oz) of flour until obtaining an homogenous mixture.
- Sprinkle some flour on your work table, place the butter mixture on the table and sprinkle more flour. Shape it into a block using a rolling pin and a metal scraper.
- Wrap the dough in plastic film.
- Place on a metal tray and refrigerate for 1 hour at 4°C (39°F).
- Make a dough in the mixer using the dough hook by mixing the second quantity of flour (260g (9.2 oz)), salt, softened butter and water. Mix until obtaining an homogenous dough.Make sure not to overwork the dough.
- Shape the dough into a square using a rolling pin and wrap it in plastic film. Allow to rest for 1 hour in the refrigerator at 4°C (39°F).
- After 1 hour, take the plastic film off the dough. Sprinkle some flour on it. Roll out the dough to 2.5 mm (0.1”) thickness.
- Roll out the butter block dough to 2.5 mm (0.1”) thickness.
- Place the dough on the butter block. Give a simple turn. Gently press with the rolling pin.
- Give another simple turn. Slightly press to make sure the folds are sealed together.
- Mark the dough with 2 fingers so that you know how many turns you have made with the dough.
- Wrap the dough in plastic film and let rest for one hour in the refrigerator.
- After 1 hour, remove from the refrigerator.
- In order to keep the rectangular shape, gently slice the side of the dough at the fold.
- This allows the dough to expand correctly, maintaining its rectangular shape.
- Roll the dough out and give a double turn (book fold) and make sure the dough is nicely flat.
- Make sure to mark your pastry puff so that you know how many turns you have made.
- A double turn is equal to 1 and a half turn. Therefore, make 3 marks with your fingers and a line to mark 3.5 turns. This is great when you are making a large production so that you do not lose track of your turns.
- Wrap again in plastic and rest again for one hour in the refrigerator.
- Remove the dough from the refrigerator and gently flatten the dough on the table.
- Sprinkle some flour very lightly so that it does not stick. Too much flour can prevent the puff pastry from rising properly.
- Remove any excess flour on top of the dough using a brush. Give a simple turn. Mark your turns (4 and 1/2 half turns) and slightly carve the side of the dough.
- Wrap the puff pastry in plastic film and let rest overnight in the refrigerator.
- The next day, flatten the puff dough and give a double turn, for a total of 6 turns. Make six finger marks.
- Wrap in plastic film and reserve in the refrigerator for about 1 hour to firm up the dough.
View tools
- Metal Tray
- Knife
- Scraper
- Bowl(s)
- Plastic film
- Rolling pin
- Brush
- Metal Scraper
- Small brush
- Tabletop mixer, mixing bowl and a hook
Pastry Cream
Ingredients: Pastry Cream
-
1.1 lbWhole milk
-
4.4 ozegg yolks
-
3.5 ozsugar
-
1.8 ozCornstarch
-
1 piece(s)vanilla bean
-
1.8 ozbutter
Preparation: Pastry Cream
- Pour the milk into a saucepan and heat over medium heat.
- Mix the egg yolks with half of the sugar. Reserve the remaining sugar. Mix well. Once well incorporated, add the cornstarch and mix well again.
- Cut the vanilla bean, scrape out the seeds and add into the milk.
- Add the reserved sugar into the milk. This helps prevent the milk from burning on the bottom of the saucepan.
- Once the milk is boiling, pour half of it onto the egg yolk mixture and whisk well.
- After whisking well, pour the egg yolk mixture back into the saucepan with the remaining milk.
- Bring to the boil.
- Once boiling, continue cooking for 1 minute while whisking.
- Turn off the heat, add the butter into the cream and whisk well. The cream should be smooth without any lumps.
- Pour the pastry cream in a container and cover with plastic film so that it touches the entire surface of the cream.
- Reserve in the refrigerator until needed. The cream needs to be completely cold when used.
View tools
- Cooktop
- Saucepan
- Whisk
- Knife
- Bowl(s)
- Mixing bowl (s)
- Plastic film
- Cutting board
- Spatula
- Container
Chocolate Almond Cream
Ingredients: Chocolate Almond Cream
-
1.8 ozButter #1
-
1.8 ozButter #2
-
3.6 ozicing sugar
-
3.6 ozalmond flour
-
0.4 ozCornstarch
-
4.3 ozpastry cream
-
1.8 ozrum
-
2.2 ozwhole eggs
-
3.5 ozCallebaut Milk Chocolate 823
Preparation: Chocolate Almond Cream
- Melt the dark chocolate with the first quantity of butter in the microwave until it reaches a temperature of 45°C (113°F).
- On medium speed, cream together the second quantity of butter and the icing sugar in a tabletop mixer equipped with a paddle attachment.
- Once well creamed, mix in the almond flour and the cornstarch.
- Then slowly add the eggs in three additions, allowing each addition to incorporate before adding the next.
- Stop and scrape the bowl to ensure even mixing, and then continue mixing on medium speed.
- Add in the pastry cream and mix again.
- Once the pastry cream is well incorporated, add the chocolate mixture, and stir in the rum.
- Finish mixing by hand using a spatula so that the texture is homogenous.
- Add in the pepites cacao and mix well.
- Pour the almond cream into a piping bag equipped with an 18mm (0.7”) tip.
- Reserve for assembly
View tools
- Microwave
- Piping Bag
- Scissors
- Scraper
- Bowl(s)
- Tabletop mixer, mixing bowl and a paddle attachment
- Spatula
- 19 mm (0.7”) piping tip
Assembly & Baking
- Lightly sprinkle flour on your work surface and on the puff pastry to prevent sticking and roll out to a final thickness of 2mm (0.08”).
- Gently roll the puff pastry around the rolling pin and transfer it onto a metal tray lined with a silpat. Cover with another silpat to keep the puff pastry from drying.
- Let it rest in the refrigerator for 1 hour - this helps to prevent the puff pastry from shrinking.
- After 1 hour, remove the dough from the refrigerator. Sprinkle a little flour on your work surface and transfer the dough back to the table.
- Cut the puff pastry with a razor using a circular template. Maximize the yield of the dough by cutting the circles as close to each other as possible.
- Transfer them to a lined tray and cover them. Rest in the refrigerator for about 10 minutes.
- After 10 minutes, remove the circles from the refrigerator and return them to the table. Brush away any excess flour.
- Brush some water around the outter edge of the circles which will help the two circles of puff pastry stick well together.
- Using an 18 cm (7”) circle, mark the center of the circle as a guide for piping the filling.
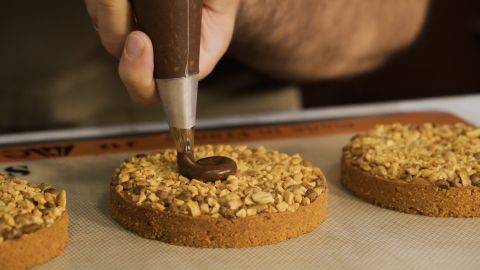
- Pipe the chocolate almond cream to a thickness of 1 cm (0.4”) starting in the center and piping outward to the mark. Optionally, add the inedible “fève” inside the cream.
- Place the second disc of puff pastry on top of the cream. Gently press around the outer edge to seal the two circles together.
- Place on a metal tray and let set in the refrigerator for 10 minutes. This helps keep the dough cold and easy to work with.
- Meanwhile, mix 1 egg and 1 egg yolk together for theeggwash.
- After 10 minutes, take the galette out of the refrigerator. Using the ring cutter, trim the edge of the galette so it is perfectly circular.
- Use a brush to eggwash the top of the galette. Make sure to only eggwash the top of the galette and not the sides to avoid the puff pastry from sticking to the tray - this can prevent the galette from rising properly in the oven.
- Put it back in the refrigerator for 10 minutes to keep it cold.
- After 10 minutes, apply a second eggwash.
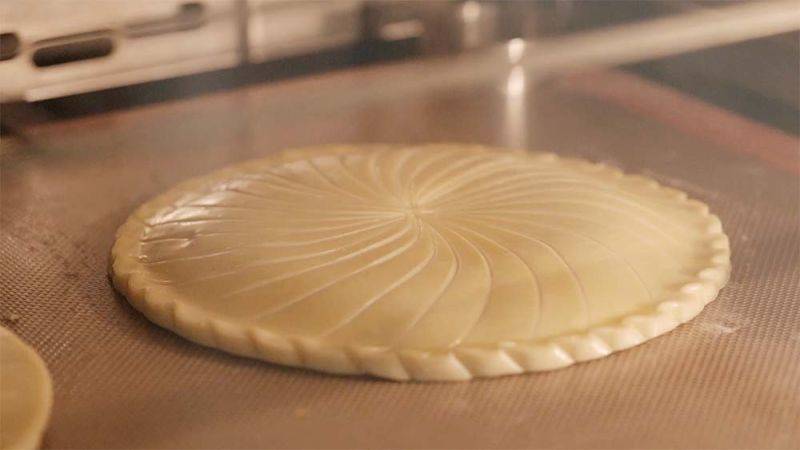
- Then, using the dull side of a knife, so that you do not cut the puff pastry, and holding your knife at a 45 degree angle, decorate the top of the galette.
- With the same side of the knife, stick the border together, gently pressing so that the dough stays together during baking. After this step, if you wish, you can reserve the prepared galettes in the freezer, well wrapped, for up to one month.
- Place on a metal tray lined with a silpat. Let rest in the refrigerator for one hour until well chilled.
- Place four metal rings on the corners of the silpat and bake the galette at 180°C (356°F) for 5 minutes, and then top with a silpat and a rack and a metal tray. Then continue baking for 25 minutes.
- After 25 minutes, remove the metal tray, the rack and the silpat and then cook for an additional 5 minutes, or until golden brown.
- Remove from the oven and while still hot, brush the top of the galette lightly with maple syrup to have a shiny finish. Allow to cool completely before slicing and serving.
View tools
- Knife
- Parchment paper
- Rolling pin
- Rack
- Brush
- Bowl (s)
- Metal Tray (s)
- Silpat (s)
- Cutter
- Fork
- Small brush
- 5 small metal rings
- 22 cm (8.25”) ring cutter
- 19 cm (7”) ring cutter
Facing Problems with your Creations?
- Find troubleshooting guides & tutorials
- Chat live with an advisor chef and find the right solution to your challenges


Comments